Recipe below: Grilled Corn Chowder
Well, fellow eaters, I am still on my exercise kick, so skip down past the next picture if you don’t want to read my latest soliloquy because either way, you are going to want to hear about this soup. The problem with discussing exercise is keeping it short, as there’s just so much to say! But I’ll attempt to rein myself in by keeping to one very specific topic. Equipment.
In my opinion there is only one piece of exercise equipment you absolutely need - a heart monitor. Whether you do swimming, running, walking, biking, cardio kick-boxing, or even weight lifting, the point of exercise is to get your heart rate up. That’s how you increase your fitness level. A higher heart rate means your heart is working harder to pump that blood through your system, making it stronger, and burning oodles of calories in the process. Monitoring my heart rate means I can ensure I am not over-doing or under-doing my workout (and it is so easy to do both!).
The way it works is a heart monitor comes with 2 pieces - a transmitter and a receiver. As I’ve seen them, the transmitter is a band that goes around your chest, just under the she-boob or he-boob, as the case may be (or as close to your heart as possible). It has these nifty sensors that can measure your heart rate pretty darn accurately when placed against your skin. The receiver is a wrist watch that displays your heart rate, and depending on the product you get, generally has a ton of other features. Mine has settings for my age, height, weight, and target heart rate, and uses this information in conjunction with my heart rate to display how many calories I’ve burned. And obviously, most can double as a real watch as well.
What should your target heart rate be? If you take a look at the cardio equipment at the gym, some machines will display a small graph with a descending line, comparing heart rate with age. That’s the really high level answer. The most basic formula is to subtract your age from the number 220 to give you your maximum heart rate. So as I’m 28, my maximum heart rate is 192. That means if I let my heart rate get that high, I am a moron who probably will seriously hurt myself. But don’t worry; I would probably pass out before it got that high anyway. Your target heart rate is all about the percentage of your maximum heart rate. And the percent you choose is based on how hard of a workout you’re looking for. 50-60% is a good place for beginners, and people looking for serious cardio health generally shoot for 70% or higher. I found this article to be a good, short summary of this information, and that website can be a great resource for more fitness information. Though it can be a bit intimidating, since it’s geared more to serious athletes that make me look like a lazy bum.
I’ve become so dependent on my heart monitor, I feel absolutely naked working out without it! But you might decide they’re not for you, and that’s okay too. There are other, far less accurate, but perfectly acceptable methods to give you an idea of how hard your heart is working. There’s the conversation method for one (or “talk test”). Do you ever come across a pair of women who are briskly walking and carrying on a full conversation? They are most likely not exercising in the aerobic zone. When your heart rate is in the aerobic zone, generally you can carry on light conversation, so short answers, not full sentences, and not easily. If your heart rate is too high, it’s uncomfortable to say more than one word before taking a breath. And, again, if you can carry on a full conversation without any trouble, your heart rate isn’t high enough. And of course, that's not to say that going for a light walk with some pals isn't a perfectly acceptable form of exercise. Something is always better than nothing. But don't go eat a big burger and fries for dinner right after, thinking you've "earned it." Be reasonable! Another method is the perceived effort test, which I don't fully understand. Basically, you figure, on a scale from 1-10 (or whatever scale you want), if 1 is no exertion and 10 is I'm gonna die if I don't stop, how hard do you perceive your current effort to be? I think it sounds weird and subjective, but hey, it's all about what works for you.
If you’re interested in reading more than you ever wanted to know about how heart rates are calculated, check out this article. That website is another great resource for people looking to learn more about fitness and general health.
I’ll wrap it up by quickly mentioning that heart rate monitors completely vary both in price and features. You can get fancy ones that compile data from all your workouts that you can upload to your computer and make big nerdy graphs with, or you can get basic ones that do little more than display your current heart rate and the time. Unfortunately, even the basic monitors are on the pricey side. While the higher end models will easily cost you hundreds of dollars, there are several good options out there in the $60-$100 range. So they’re doable. I use my heart monitor every time I exercise, so I’ve definitely gotten my money’s worth! The one I use is a few years old now, but it’s pretty similar to this model from Polar.
Have you ever used a heart monitor and did you find it useful? Do you tend to over-work or under-work your love organ when you work out?
I meant your heart, what were you thinking of?
Have you ever used a heart monitor and did you find it useful? Do you tend to over-work or under-work your love organ when you work out?
I meant your heart, what were you thinking of?

My greatest blog supporter sent me a message yesterday with a link to this article and mentioned it would be a good idea to make reference to some of the health benefits of the delicious, whole foods I’m always yapping on about. What a concept! You’ve probably seen the term “superfood” listed in hundreds of health articles. It’s quite the buzzword at the moment. But it’s a good buzzword! Eating a diet rich in whole foods instead of processed foods means you’re not just eating less calories and cutting out things your body doesn’t need, like preservatives, it also means you’re getting all the vitamins, minerals, and other compounds found in whole foods that are destroyed during processing. The general idea I would take from this list is that it’s important to eat a healthy variety of nuts, beans, lean proteins, and as many colorful fruits and vegetables as you can stomach. Hit up all the food groups, and don’t forget that herbs and spices come from Mother Earth too! Your well-harnessed radicals will thank you.
I will say it was a very timely message, since allllll the way at the bottom of that list is corn. And corn just so happens to be what I’m touting today! It apparently protects against UV damage. As someone as pale as a ghost and susceptible to sunburns faster than Husband can inhale a blueberry muffin, the antioxidants found in corn are for me!
[And thank you, friend, for providing me a somewhat more graceful segue into today's recipe. Trying to get from heart monitors to corn was really throwing me for a loop!]
So, it’s corn season! A fact that in past years wouldn’t have excited me in the least. I was just never a corn person. Then one day on a hot July afternoon, Husband grilled some corn, and it’s been a love affair I’ve been relishing ever since. Amazing how that grill, to borrow a phrase, makes my skirt fly up, it’nd it?
Now I’m sure most people have had grilled corn. Go to any place they’re grilling meat, and you’ll see naked ears thrown down and slathered in a ton of butter. That’s not the grilled corn I’m talking about. Oh-ho no. This grilled corn is fat-free. No joke! See, I leave the husks on. When I buy corn at the store I always see a gaggle of people standing around the corn bin, husking their corn and shoving the naked ears into plastic bags. It’s tragic! Corn deserves some dignity, people! By grilling the corn in the husk, the husk dries out over the open flame and gives off this amazing corn aroma that infuses into the kernel. Also, the corn can fully cook without burning because it cooks most of the way through in the husk, where the open flame can’t get it. Then I remove the husks and let the naked corn do its delicious caramelization thing, and voila! Perfectly cooked, sweet corn, plumped and browned kernels, and all with a totally punched up flavor.
You’ll never husk your corn at the store again. Admit it.
Since this amazing discovery - which I hate to admit is, once again, all Husband’s own genius. Darn him. - I have been grilling corn left and right. Grilled corn and edamame miso salad. Grilled corn pesto (this one is in the posting queue as well...*droooool*). And this here grilled corn chowder. I had been ogling corn chowders all summer, and with all the ingredients needed conveniently located in my kitchen, how could I say no?
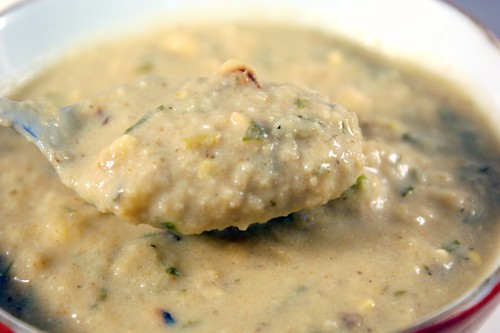
This chowder was silky. It was sweet, it was spicy enough to make it interesting without making it hot, and it was creamy without being heavy. In a summer chowder it is imperative to be creamy but not heavy. Not only are soups leaden with cream, cheese, and butter generally pretty unhealthy, but they are just about the most unappetizing thing to eat on a hot summer day. So here’s my trick for getting a silky texture in a pureed soup sans dairy - roasted cauliflower. It lends a delicate sweetness that blends seamlessly with any soup, and has a thick, creamy texture that can rival cream without weighing it down. It is my secret weapon! That said, this recipe does actually have a small about of cream and milk. Quite honestly, I added them because I had tiny amounts of each in the fridge and just wanted somewhere to dump them before they spoiled. I think I would keep the milk in, but next time I would nix the cream. It was seriously not needed, and even a little too heavy for my taste. I left them in the recipe, though, because I know most people probably like creamier soups than I do. I’ve been off heavy foods for so long, I’m just uber-sensitive. Heck, you could even add more. Isn’t cooking to your liking, after all, what makes home cooking great?
Now I’m sure most people have had grilled corn. Go to any place they’re grilling meat, and you’ll see naked ears thrown down and slathered in a ton of butter. That’s not the grilled corn I’m talking about. Oh-ho no. This grilled corn is fat-free. No joke! See, I leave the husks on. When I buy corn at the store I always see a gaggle of people standing around the corn bin, husking their corn and shoving the naked ears into plastic bags. It’s tragic! Corn deserves some dignity, people! By grilling the corn in the husk, the husk dries out over the open flame and gives off this amazing corn aroma that infuses into the kernel. Also, the corn can fully cook without burning because it cooks most of the way through in the husk, where the open flame can’t get it. Then I remove the husks and let the naked corn do its delicious caramelization thing, and voila! Perfectly cooked, sweet corn, plumped and browned kernels, and all with a totally punched up flavor.
You’ll never husk your corn at the store again. Admit it.
Since this amazing discovery - which I hate to admit is, once again, all Husband’s own genius. Darn him. - I have been grilling corn left and right. Grilled corn and edamame miso salad. Grilled corn pesto (this one is in the posting queue as well...*droooool*). And this here grilled corn chowder. I had been ogling corn chowders all summer, and with all the ingredients needed conveniently located in my kitchen, how could I say no?
This chowder was silky. It was sweet, it was spicy enough to make it interesting without making it hot, and it was creamy without being heavy. In a summer chowder it is imperative to be creamy but not heavy. Not only are soups leaden with cream, cheese, and butter generally pretty unhealthy, but they are just about the most unappetizing thing to eat on a hot summer day. So here’s my trick for getting a silky texture in a pureed soup sans dairy - roasted cauliflower. It lends a delicate sweetness that blends seamlessly with any soup, and has a thick, creamy texture that can rival cream without weighing it down. It is my secret weapon! That said, this recipe does actually have a small about of cream and milk. Quite honestly, I added them because I had tiny amounts of each in the fridge and just wanted somewhere to dump them before they spoiled. I think I would keep the milk in, but next time I would nix the cream. It was seriously not needed, and even a little too heavy for my taste. I left them in the recipe, though, because I know most people probably like creamier soups than I do. I’ve been off heavy foods for so long, I’m just uber-sensitive. Heck, you could even add more. Isn’t cooking to your liking, after all, what makes home cooking great?
I’ll also add that I used sherry in this recipe over white wine only because I was too lazy to go open a new bottle of wine when I had an open bottle of sherry sitting right next to me on the counter. All decisions are not taste inspired. I admit it openly! I also added the celery salt because I had just bought it on super clearance at the store and I wanted to try it. Yep, I’ll just air all my dirty laundry here today. But really, I think they both worked in the recipe. If you don’t have celery salt and an open bottle of white wine...well I think you know what to do. As for the rest of the herbs and spices that made this soup what it is...I used the Julie method - pull out the spice drawer in the pantry and just grab what sounds good! They did exactly what I wanted them to, which is add a complexity to the dish without overpowering the star - the corn. So many chowders just rely on the fat from the cream and the sugar from the corn to provide all the flavor. That’s boring! Punching up flavor without adding calories is what good healthy cooking is all about.
The best thing about this soup was, of course, the corn! And it was everywhere in this soup because I used every bit of it! Once I had removed the cooked kernels from the cob, I simmered the empty cobs in the broth. That's right, no weak corn flavor here! This way I was able to keep the corn kernels whole and still get the rest of the soup infused with corn flavor. This soup was sweet but not sugary, rich but not heavy, and rustic but not unsophisticated. Definitely a permanent addition to my summer soup repertoire! Take this recipe and make it your own. Just make sure you grill the corn, you won't regret it!
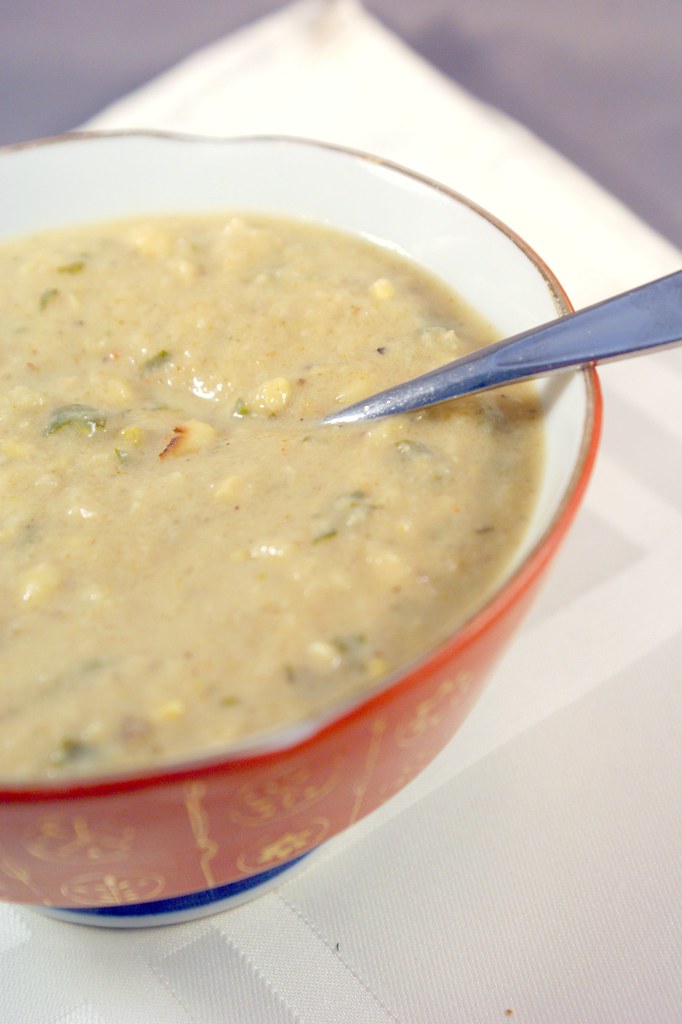
Grilled Corn Chowder
makes about 8 servings
4 ears of corn (in their husks!)
2 TB olive oil, divided
1 tsp salt, divided
1 large onion, chopped
2 medium shallots, finely chopped
5 cloves garlic, minced
2 jalapenos, seeded and minced
1 large russet potato, diced
1 small head cauliflower, roughly chopped
1/2 tsp ground black pepper
1 1/2 tsp sweet paprika
1 tsp ground coriander
1/2 tsp celery salt (optional)
1/4 tsp cayenne (or more to taste)
2 tsp dried oregano
1 tsp dried tarragon
1/2 tsp cumin
2 cups dry sherry (or white wine)
4-5 cups chicken broth
1/4 cup heavy cream (optional)
1/2 cup whole milk
1/2 cup cilantro, finely chopped
To grill the corn:
- Over medium heat, place the corn (in their husks!) on the grill, directly over the heat. Turn the corn every 2-3 minutes, when the husks begin to blacken. The silk or ends of the husks might catch fire as they dry out. I think this adds an amazing smoky flavor to the corn, but if you’re scared (chicken!), just make sure to trim those bits off before you put them on the grill. [Practice proper safety! Always use long tongs when handling the corn, and keep your digits away from the flame.]
- When the husks are good and charred and the kernels are mostly cooked, remove the corn from the grill and place it in a pan or bowl you have standing by until it cools down a bit. Carefully peel back and remove the husks, watching out for any trapped hot steam. Place the naked ears (teehee!) back on the grill and turn every 1-2 minutes, or until as many kernels as possible have browned and caramelized. Brown = sweet flavor!
- Remove the corn from the grill, and when it is cool enough to handle, cut the kernels from the cob. Scrape the back of your knife along the cob to really get all the creamy corn bits out of there. Set the kernels aside, and reserve the empty cobs as well (don’t throw them away!).
- In a dutch oven or soup pot over medium heat, sauté the onion and shallots in 1 TB of olive oil and 1 tsp of salt until they are soft and starting to brown, about 10 minutes. Add the garlic and jalapeno and cook another 3 minutes, until softened. Add the potato and cook until starting to soften, about 5 minutes. Add the remaining tsp of the salt, pepper, paprika, coriander, celery salt, cayenne, oregano, tarragon, and cumin, stir to coat the vegetables, and let it cook for about a minute, until the spices release their fragrant oils.
- Increase the heat to high and deglaze the pot with the sherry, making sure to scrape up any flavor bits from the bottom. Bring the sherry to a simmer and let it reduce by half, about 1 cup of liquid. Add the chicken broth, and when it has come to a boil add the reserved empty corn ears. Reduce the heat to low, cover the pot and simmer for at least 30 minutes. The longer you let it simmer, the more flavor the soup will have. I would shoot for an hour if you have the time.
- While the soup is simmering, preheat the oven to 425 degrees. Spread the chopped cauliflower in a single layer in a roasting pan, and toss with the remaining TB of olive oil. Roast in the oven for about 20-25 minutes, or until the cauliflower is soft and starting to brown around the edges. Check on it about 10 minutes in and give it a good stir so it browns evenly.
- When the soup is simmered to your satisfaction, remove the pot from the heat and let it cool down a little. Remove and discard the ears of corn, and stir in the roasted cauliflower. When it is cool enough, puree the soup using an immersion blender, blender, or food processor.
- Place the soup back over medium-low heat. Add the reserved corn kernels, cream, and milk. Bring the soup to a bare simmer and let it cook for 10 minutes or so, just to let all the flavors come together.
- Stir in the chopped cilantro at the very end and serve.