Monday, June 28, 2010

Cinnfully Delicious

Recipe below: Tipsy de Leche Cheesecake Squares

The last P is here! Were you dying in anticipation? I know you were. Even though I already told you it was practicality, and even though that’s pretty darn self explanatory. That said, let me explain to you all about it!

All those instances in the two previous posts where I mentioned being reasonable? That’s where the practicality comes in. Use your judgement! Whatever I tell you, whatever anyone else tells you, it should make sense. Starving Cleansing myself with some nasty lemonade pepper mixture for a week obviously isn’t healthy. Reverting to our hunter/gatherer roots and cutting out all foods that depend on “modern” agriculture is...well probably fine, but weird, and must be a total pain. No wheat! And cutting out entire food groups (i.e. super low-fat, super low-carb), or depending on outside companies to feed you is not a realistic long term solution. What happens when you’re fed up with your diet? You haven’t built any new habits, so you’ll go right back to your old ones. If it doesn’t sound healthy, don’t do it. If it’s a temporary solution, it won’t be a permanent solution, so why do it?

I also thought of some more Ps that have been important to my weight loss.  It's a coincidence, I swear. Patience and persistence. If you’re being healthy, it’s not going to be fast. You’re going to have good days and bad days. It’s all about sticking with it. It’s not about making numbers move on a scale, it’s about feeling good! Change is hard, in any aspect of life. Have the patience to learn what works for you, and have the persistence to see it through.

Being mindful of portion, proportion, practicality, patience, and persistence, these guidelines have really helped when relearning how to feed myself. And it was a learning process. But at the same time, it was actually kind of fun! Every week was a new experiment. I found some recipes that sounded delicious, tried them out, had some hits, had some misses, and then tried a new experiment the next week. I figured out what I was comfortable with, what I enjoyed, and as I cooked more recipes, it got easier and it ended up being a lot of fun! I didn’t set out to develop a serious cooking and baking hobby. It just happened! I just wanted to learn how to cook well enough to feed myself in a healthy way. You don't have to get as involved as I did.  Healthy options can be fast and easy, and even inexpensive!  Give change a chance.


I've always loved cheesecake, but I’ve never owned a springform pan, which kept me from attempting my own all this time. Then I saw this recipe for cheesecake squares, and the heavens parted. Why didn’t I think of this sooner?

I love the combination of graham crackers and cinnamon, so I thought infusing it with a little Goldschlager, which is a cinnamon liquor, would go nicely. And it was awesome! Don’t have Goldschlager on hand? Well I highly recommend it for your liquor cabinet. Ever had a gingerbread martini? It's 2 parts Bailey’s, 1 part butterscotch schnapps, 1 part Goldschlager, shaken over ice. It will change your life. My favorite cocktail to drink around Christmas.

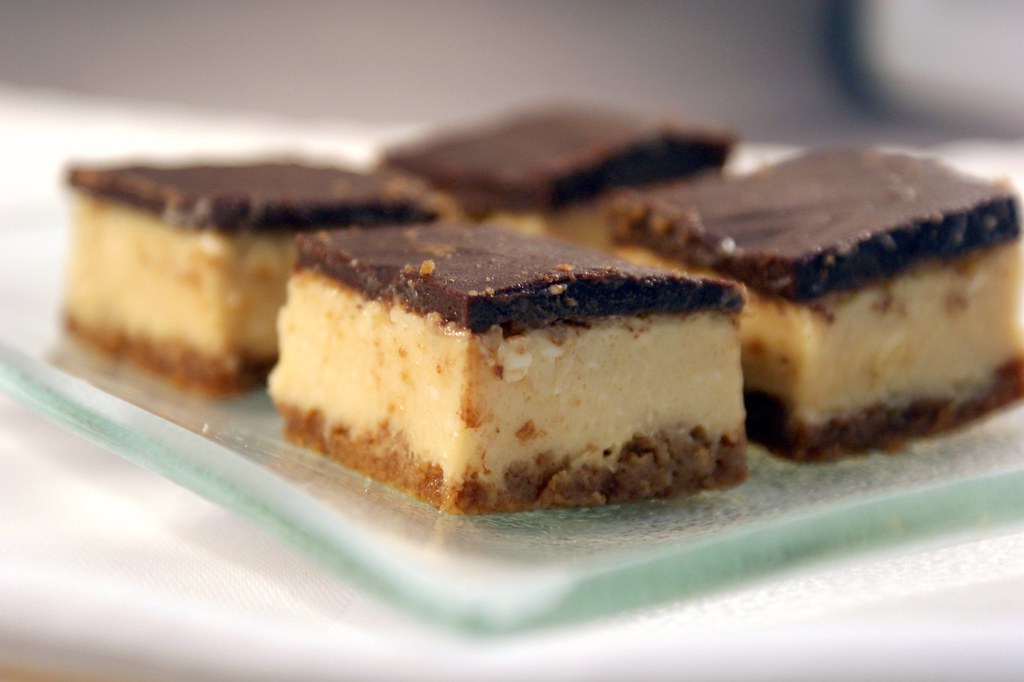
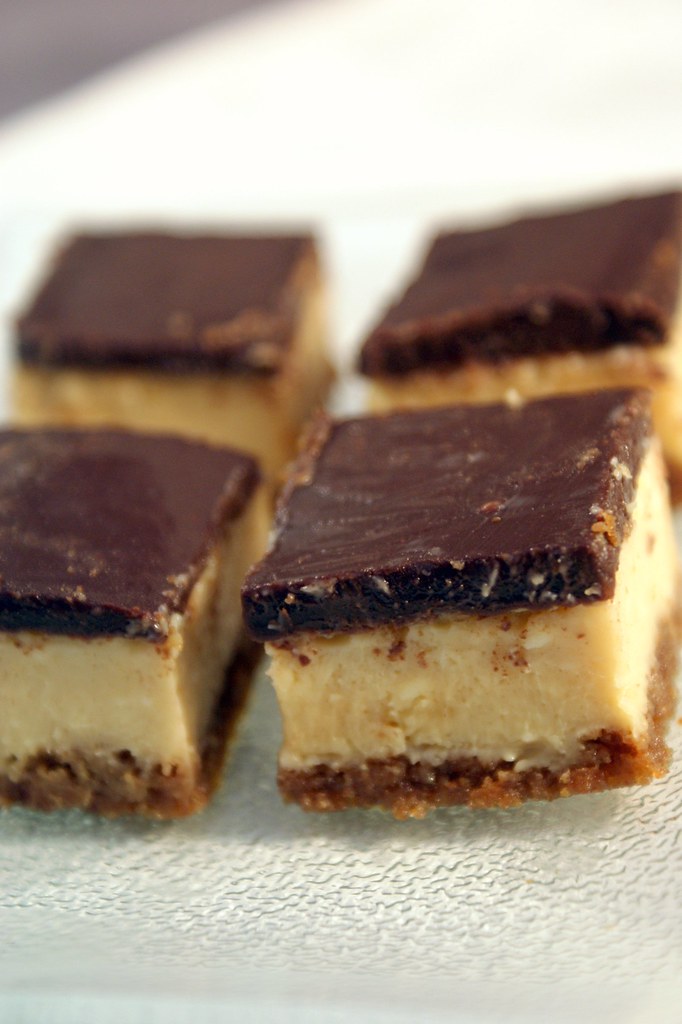
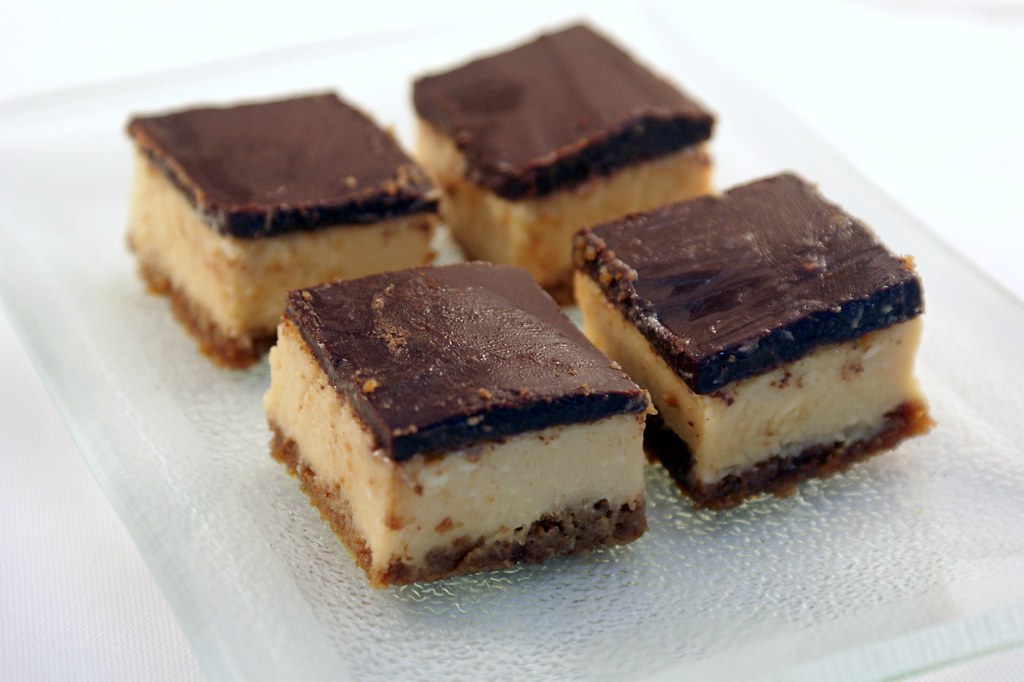
I love the deep, rich sweetness from the dulce de leche, and the Kahlua complimented the flavor subtly, but deliciously. Next time I want to try it with rum just to see if it holds up a bit stronger, but I definitely liked the Kahlua. Do I even need to go on about the flavor of these little gems? The cinnamon graham crust, the creamy, caramel cheesecake, the silky chocolate... They are divine. Heaven in your mouth. Ecstasy!  All the flavors and textures were wonderfully balanced in a perfect bite.

I cut these up super small so I could have just a bite of deliciousness. They are rich and the flavors are bold, so a bite was really a satisfying treat.  Feel free to cut yours a wee bit bigger.

The original recipe called for a 8 inch square baking pan, which I don’t have, and I didn’t modify the recipe to account for that when I made it. I think overall it was fine, but the crust layer was a bit too thin.  I had to really stretch out the crust layer to cover to whole pan. So I tweaked a few of the ingredients in my recipe to account for it.

This recipe, I would guess like many cheesecake recipes, is a bit of a process.  It involves lots of time in the refrigerator to chill and set, so make sure you read through the entire recipe before planning to bake it up an hour before company comes over.  I'm notoriously forgetful of that kind of thing when I bake.


A special thanks to my friend Geri for helping me come up with the name of these beauties!  You gotta have fun with it, right?


Tipsy de Leche Cheesecake Squares
Adapted from Smitten Kitchen

Makes 81 1-inch squares

For the crust:
4oz graham crackers, or enough for 1 1/4 cups of crumbs
2 TB sugar
pinch of salt
1/4 cup unsalted butter (4 TB), melted
2 TB Goldschlager (cinnamon liquor)

For the cake:
1 14oz can sweetened condensed milk (for the dulce de leche)*
1 tsp unflavored gelatin
1/4 cup milk (I used 1%, but whole is probably preferred)
1 8oz package cream cheese, room temperature
2 large eggs, room temperature
1/2 tsp kosher salt
1/4 cup Kahlua (or rum)

For the glaze:
3.5 oz dark chocolate, finely chopped
1/4 cup unsalted butter (4 TB)
2 tsp light corn syrup


For the crust:
  1. Preheat oven to 325 degrees. Line a 9 inch square baking pan with a sheet of aluminum foil, leaving a few inches of overhang on the two opposite sides. Lay another sheet of aluminum foil similarly, covering the other two sides. Spray the pan with baking spray for good measure.
  2. In a food processor, break up the graham crackers and pulse until you have crumbs. Measure out 1 1/4 cups of the crumbs, remove any leftover (and munch while you bake!), and put the measured crumbs back in the bowl of the food processor.
  3. Add the sugar and salt, and with the mixer running, drizzle in the melted butter and then the Goldschlager and blend until it is fully combined.
  4. Press the mixture into the prepared baking pan in an even layer. Bake 10 minutes, then cool in the pan for 5-10 minutes.

For the cake:
  1. To convert the sweetened condensed milk to delicious dulce de leche, pour the can of milk into a bowl (or small pot) set over simmering water. Cover bowl and cook, stirring occasionally, for 40-50 minutes until the milk is thickened and a light caramel color.*
  2. In a small bowl, sprinkle the gelatin over the milk, and let stand for 2 minutes.
  3. In a stand mixer, beat the cream cheese, eggs, salt, Kahlua, and milk mixture at medium speed for a few minutes until fully combined. Add 1 cup of the dulce de leche and mix at low speed until just combined.
  4. Pour the batter over the crust and smooth into an even layer. You're going to bake this in a hot water bath.  To do this, place the baking pan in a larger oven-proof container (I used a large roasting pan), and pour in boiling water until it reaches about halfway up the pan. Carefully move this to the oven and bake at 325 degrees until the center of the cake is set, about 40-45 minutes.
  5. Chill the cake completely in the pan for a few hours, then chill in the refrigerator, covered, for several hours or overnight.

For the glaze:
  1. In a bowl set over a pot of simmering water, combine all the ingredients. Stir until the chocolate is melted, and everything is incorporated and smooth.
  2. Pour mixture over the cheesecake and spread in an even layer. Chill, uncovered until the glaze is set, about 30-40 minutes. Make sure it's not too hard or it will be difficult to cut your squares.

To serve:
  1. Using the overhanging foil, gently pull the cheesecake from the pan and place on a cutting board. Using a thin knife, cut cake into 1 inch squares. To make sure you don’t make a total mess of your beautiful squares, wipe off the knife after each cut.
  2. Store in an airtight container in the refrigerator.
*Note: You can also buy dulce de leche, but I figure why bother?  It costs twice as much, and it's not hard to make.  But if you prefer to save a step over a penny, just measure out 1 cup of the store-bought stuff. 

Thursday, June 24, 2010

Condiment Obsession

Recipe: Wasabi Tofu "Mayo"

Alright, so last week I left off the 3 Ps discussion with portion.  I've been thinking about what I want to say about the next P ever since.  Proportion. If portion is all about what size your plate is, I think of proportion as deciding what goes on the plate.  A small bowl of chocolate ice cream has a heck of a lot more calories than a bowl of roasted broccoli, and the broccoli has all those wonderful vitamins and minerals, not to mention an awesome little thing called fiber.  Rather than associating fiber with poop, as some may tend to do, try thinking of it as a nutrient in food that makes you feel full and for longer.  And as my mom always said, "it escorts the fat out of your body".

Yes, I mentioned poop on a food blog that's intended to get you to salivate over my delicious recipes. Yes, I can't help myself.  Yes, I'm seeing someone about this problem...or rather, I would be if I could afford a shrink.  I can't even afford a haircut people.  I'm starting to look like cousin it, but frizzy.  Yes, I made chocolate ice cream and roasted broccoli last week, so I have both on the brain.  Yes, they were both delicious.  And yes no, I did not eat them together.

What I'm trying to get at here is that it's all about balance.  We're not supposed to eat all of the same food, right?  Sure, Husband wishes he could eat steak 3 meals a day, but that's just not reasonable.  There are things called food groups, and we're supposed to eat a certain amount of food from each food group each day to get the nutrients we need to be healthy.  You might remember seeing a chart at some point in your life with a picture of a pyramid and random foods all stacked on top of each other and topped with the delicious sweets at the top. You might remember more recently seeing one that is eerily similar but at points different.  I personally don't subscribe to any ancient Egyptian depictions of food proportions.  What do they know?

Now I'm not a nutritionist.  I'm not an expert.  I'm just telling you how I ate to lose weight and get healthy.  Everybody is different.  Everybody has different needs.  You'll have to identify your own needs based on how much you exercise and just how your body chemistry is made up.  I try to eat pretty low in complex carbs (as in grains, breads, pastas, all that tastiness), not because carbs are evil, but because my body just doesn't seem to like a lot of 'em.  I get all icky-digesty and feel sluggish when I eat a heavy-carb based meal.  Not to mention my body seems to burn through carbs like a shopaholic on Black Friday.  I could eat an endless bowl of pasta...forever.  I know this about myself, so I treat carbs as a side component in a meal, rather than the star.  Also, since I exercise an above average amount, I eat a fair amount of protein.  Not just meat, but dairy, nuts, beans, lentils, etc.  How do you know what your body needs?  Listen to it!  When you eat a bowl of pasta, how does it make you feel?  Are you hungry again 5 minutes later?  I wasn't a big meat eater until very recently, and I ate protein in general pretty sparingly.  Then I started exercising, and high protein foods not only started tasting better to me, but I was actually craving them!  I wanted meat!  That was my body telling me it needed more of the nutrient to build my big strong muscles I was working so hard for.

But of course, those pesky macro-nutrients overlap (protein, carbohydrates, and fat).  Protein does not = meat.  Carb does not = bread.  Fat does not = butter.  Let's not be so cut and dry and try being reasonable. And you need each one of those macro-nutrients, so don't cut anything out!  It's not about low fat or low carb.  It's all about balance.  In other words, proportion!

There's one main guideline I like to follow: eat as many vegetables as you want.  Vegetables are so stinking healthy and low in calories (compared to volume), that I'll bet I would be physically sick before I could eat enough to get fat.  And I'm not talking about corn soaked in butter, people.  Be reasonable.  You know why?  Fiber!  Vegetables are chalked full of it!  Not to mention vitamins, minerals, sometimes a bit of protein, and sometimes a bit of sugar to make 'em yummy.  That means vegetables make you feel full.  And when you're full, you tend to stop eating.  That's always my problem. The stopping of the eating.

So here's what I do when building my plate (and that would be the appropriately sized small plate we discussed).  I fill half of it with vegetables.  That's right.  Half.  That's half your stomach room going to something that's rich in nutrients and that's going to stick with you for a solid few hours.  Now hear me out!  Sure, half a plate of green beans doesn't appeal as much as filling half that plate with garlic bread or pork chops.  Or rather, they don't right now.  You want to know something funny?  My taste buds completely changed with my eating habits, not to mention my attitude.  I started off this whole thing tolerating the vegetables.  They were something to get through.  Then as I ate them more, I started finding better ways to cook them.  Sure, steamed broccoli is ok, but if you roast it in the oven it's 20 million times tastier!  Cabbage braised with a horseradish sauce?  Delicious!  I say my taste buds changed, but I think really my approach to cooking vegetables is what improved.  The veggies don't have to be plain.  It's ok to spice them up with sauces, spices, and additions like nuts.  Make a complete dish that you want to eat.  When I started putting some real effort into preparation, everything starting tasting better.  Before I knew it, I was craving vegetables!  I'm not even exaggerating!  Last time I visited my parents my mom kept laughing at how insistent I was that our meals at home consist of enough vegetables to handle me.  "That salad is enough for me, but what about the rest of you?"  Give vegetables a chance.  And not just lettuce!  Don't just go home and eat a salad for dinner.  Spice it up!  I rarely eat lettuce.  Sure, it's healthy, but it's mostly water and doesn't stick with me like heartier vegetables do.  Not to mention it's rather boring!

So our plate is half full with vegetables, now what?  I usually split what's left in half and fill one remaining quarter with protein, and the other with whole grains.  Now from this description you're probably envisioning a plate split into three sections, one with some boring plain vegetable, one with a piece of meat, and one with some brown rice.  That's not really how you have to eat.  That's just what the proportions should look like.  Use that idea to make a complete combined dish, by all means!  For instance, I made a thai curry last week.  I used a ton of vegetables.  I spooned an appropriate amount of the vegetable curry mixture over some quinoa.  Not a bowlful, mind you.  Quinoa is a super healthy ancient grain that's very high in protein.  I had some cooked chicken left over from another dish, so I put an ounce or two on top.  At the end of the meal, I think my proportions were about right.  It's not a hard and fast rule, it's a guideline to keep in mind when you're building your meals.  And being mindful of proportion is definitely one of the main factors that led to my weight loss.

Now I know I've left some stuff out, like fruit and dairy.  I actually eat quite a bit of fruit, but I eat it with breakfast and as a snack later in the day, not generally as part of a main meal.  Same with dairy.  If they make it into other meals, great.  In my book you can't have too much fruit either.  Just don't eat it in place of vegetables.  

There's so much to say on this subject!  But I'll have to cut it short in the interest of theoretical finite interweb space.

To say it much, much more succinctly, don't just think about total calories.  Think about eating the right calories that are going to make you feel the best.  Just remember, portion is all about how much food you eat, and proportion is all about the type of food you eat.


Time to change gears and get to a recipe already!  I was watching Diners, Drive-ins, and Dives on Food Network a few weeks ago and they were talking to this guy that does grilled cheese sandwiches.  He made this one sandwich with seared ahi and what he called wasabi mayonnaise.  But it wasn't mayonnaise at all!  It was tofu he combined in a food processor with wasabi powder and a bunch of other Asian-inspired ingredients.  Genius!  I decided to give it a go with a few additions of my own, and the results were pretty much spectacular.

It sounds odd, I know, but trust me.  This stuff is addictive!  I have been eating it on anything and everything ever since.  As a salad dressing on baby spinach, on brown rice sprinkled with seaweed and sesame seeds (that was such a wonderful combo), and drizzled over chicken tacos.  Yum!  For demonstration purposes (i.e. the picture at the top of this post) I poured some over some leftover quinoa I was snacking on.  That was delicious too.

The great thing about this stuff is it's super healthy!  If not for the tiny bit of sesame oil, it would basically be fat free, and since tofu is the base, you get a good punch of protein.  You're probably wondering how the tofu flavor comes through, and the answer is it doesn't at all.  The tofu gives a creamy, mayonnaise-like texture, but the flavor comes completely from the other ingredients.  The green onions and cilantro really brighten the mayo, and the wasabi powder gives it a nice kick and complex flavor.  The mirin and sweet soy sauce give it a bit of needed sweetness, which could easily be substituted with sugar and some added soy sauce if you don't have them in your pantry.  Ginger and garlic are a must in my book, but I didn't have any fresh, so I used powdered, and it worked just fine.  It's a recipe you can play around with.  I just kept throwing in ingredients until it tasted good to me.

This is definitely something you can throw together with whatever you have in your pantry and refrigerator.  As long as your combination of flavors is good, your mayo will be delicious.  You could even go in a completely different direction, and nix the Asian flavors all together.  You could try sun-dried tomatoes, basil, garlic, and some red pepper flakes for an Italian sub.  Maybe some good chili powder, cilantro, green onions, and jalapeños for a chicken quesadilla?  The possibilities are endless!

I bought a bunch of 8oz squeeze bottles at Smart & Final a few months ago.  Best purchase ever.  They were just a couple of bucks, and are great for storing various homemade condiments like strawberry puree I like to keep on hand for topping desserts, bbq sauce from scratch, and this wasabi mayo!

This recipe is also very budget friendly.  I bought the tofu on sale for $.99, the cilantro and green onion bunches were $.25 each, and everything else was just little bits from my pantry.  You can't buy a jar of mayonnaise for that!

Sure, it sounds weird, but it's also delicious, so give it a try!


Wasabi Tofu "Mayo"
inspired by the sandwich dude on Triple D

Makes about 12oz

1 package silken tofu, drained
3 stalks green onion, chopped
1/4 cup cilantro, chopped
1 heaping TB wasabi powder
1 TB fresh ginger, minced, or 1 tsp ground ginger
3 cloves garlic, minced, or 2 tsp garlic powder
2 TB soy sauce
2 TB rice wine vinegar
2 TB sesame oil
2 TB mirin (sweet rice wine)
juice of 1 lime
1 TB sweet soy sauce (or use extra soy sauce and a little sugar)

  1. Combine all ingredients in a food processor and processes until everything is well incorporated.  Taste mixture, and adjust seasoning to your liking.
  2. Pour the mayo into a squeeze bottle or tupperware for storage.   

Monday, June 14, 2010

The 3 Ps, Portion, And Delicious Cake

Recipe: Brandy Buttermilk Apricot Cherry Upside-Down Cake

I read somewhere a few months ago that one of the reasons maintaining weight loss is so difficult is that a person spends so much time thinking about food while they're losing the weight, that when they've finally lost it, they are completely food obsessed.  As you can imagine, it's very difficult for someone who is obsessed with food not to eat...and eat...and eat...to the point of obesity!  And I can tell you, it is so true.  I was food obsessed before I lost 70 pounds, so you can imagine my struggle to balance my constant desire to shovel food in my mouth with my desire to stay healthy.  No really, when I say obsessed, I mean obsessed!  A good or bad meal can instantly affect my emotional state.  My social activities generally involve food in some way.  Want to hang out?  Sure, let's grab lunch!  You want to see that new movie with me?  Awesome, let's hit up the matinée and get dinner afterwards!  Hey Julie, how was your vacation?  Great!  The food was good!*  So yeah, I think it's safe to say I genuinely love food.  I am not one of those people couldn't care less what foods they ate, so eating healthy is just as easy as eating unhealthy. Oh ho ho ho, no.

I've developed a few methods for keeping my eating in check because a healthy lifestyle is about so much more than just switching to healthier food choices.  Despite what the masses tell you, there are no "good foods" and "evil foods".  Fat (and then Carbohydrates) is not the Devil's nutrient. Everything is a balance, and the loss of that sense of balance is why we're all fat!  And I could go on, but you don't have all day.

One of these methods, it's really more of a healthy lifestyle philosophy, I call the 3 Ps.  And those Ps would be portion, proportion, and practicality.  [I thought about prudence instead of practicality, but who wants to be prudent?]  Yeah, I know...it's is beyond cheesy.  But I can't help it they all begin with P!  Just bear with me people, mkay?  In the interest of keeping this post at short story length, I'm going to break this explanation up into a series.  Today I'll talk just about portion.

One of the keys to eating right is eating the right amount and eating the right amount of the right things.  [And if you only had to read that sentence once to understand it...10 points for you!] That's where portion comes in.  It refers, of course, to portion size.  As gluttonous, greedy Americans, we have been bred to always want more.  It's economical.  And we're nothing if not economical, am I right?  I'm sure you've read the news stories about how much more a single serving of coffee is today versus 50 years ago, or how much bigger portion sizes are at restaurants.  The first thing you need to do is get your portions back under control.

I find this difficult because when I'm eating something I like, I want to keep eating it until I can't possibly eat any more.  Well that's just too damn bad.  Now I (on my good days) eat the amount of food I need, rather than the amount of food I want.  I judge my need based on both hunger and calories.  I took some time to research the amount of calories I needed to eat in a day based on my sex, height, weight, and activity level, divided it up between whatever meals and snacks I wanted to eat in a day, and tried to hit those goals.

I just scared you away, didn't I?  Counting calories scares a lot of people away.  Including me.  Fear not!  In all that work I figured out that if I also ate the right proportions of types of food and stayed practical and realistic, I was hitting my calorie target all on my own.  No counting calories needed!  Thank goodness!  Basically, the idea is eat until you're no longer hungry, and try to eat sensibly.

So as I was saying, one important step to overcoming over-eating was getting a handle on my portions.  I'm sure you've heard this before, but it is so true.  Using smaller vessels to hold your food helps you eat less.  Now, I'm not saying switch your soup bowl out for a shot glass.  Be reasonable!  But switch out your ridiculously large dinner plate for a salad plate, perhaps.  Not only does it keep you from piling too much food on your plate, but you'll feel like you're eating a lot of food because the plate is full.  No joke!  If you scoop a correct serving of rice onto a giant plate, your eyes are going to tell you you're not eating very much, and your eyes send data to your brain way faster than your stomach!  I know when Husband and I finally replace our hand-me-down dinnerware collection (We kind of desperately need to.  As much as I love it, it's totally chipped!), it's going to be hard to find something isn't ridiculously over-sized.  Gluttonous, greedy Americans, remember?  If you're worried about taking too little food, just remember you can always go back for seconds if you really need to.  I don't recommend having seconds as a general rule, but if you do just be sure to wait 15-20 minutes between helpings to give your stomach a chance to tell your brain you're full.

The same goes for containers you pack your lunch in.  If you have some huge 4 cup capacity container to hold your super healthy brown rice and vegetable stir fry, when you go to fill it up, you're going to keep filling and filling until it's full, or at least way fuller than it should be.  And while one of the perks of healthier eating is getting to eat more food for the same amount of calories as unhealthy foods, there is a limit.  Be reasonable!  Here's why.  When you eat a lot of food, your stomach expands.  When you eat less food, it shrinks.  When your super stretched out stomach is empty, you eat until that big stretched tummy feels full.  If your stomach isn't so stretched, you feel full sooner, and as a result eat less to get that same satisfied feeling.  So it's not just about what you eat, but how much.  Being able to control your portions is essential.

Baby steps!  When faced with a sweet tooth and an uncut cake, I'll take a bigger piece than I should just as sure as the next gal.  That's why I take steps to prevent Piggy Julie from rearing her ugly snout.  You may recall I posted a few of those steps? Just being aware of your portions ensures you're headed in the right direction!


*It's completely true that I judge a place I've been based on how good the food was.  What's worse, my desire to visit a particular location is generally right on par with how good their food reputation is.  Case in point, I couldn't wait to visit France and Greece, and oh my word is the food there ever the best!  Germany?  Not such a huge desire.  That's not normal, right?


If you couldn't tell from the pictures of cake sprinkling this post, I may have just been bestowing my wisdom about eating right as a way to off-set that fact that I'm posting another delicious Summer fruit dessert.  Not to mention, that makes you one of the most unobservant people ever.  Way to go.  Did you also fail to observe that the Summer stone fruit is finally here?   I for one did not!  I love stone fruit!  Apricots, peaches, and plums, oh my!  What's more, I love baking with stone fruit!

You know what I really love about this cake?  It was one of those unexpected kitchen successes. I had some apricots and wanted to do an upside-down cake, so I hunted around my Google Reader until I found one that tickled my fancy.  As luck would have it, I had cherries on hand too!  I thought I'd get something ordinary but delicious, but this cake was delicious!  I actually exclaimed "Oh my!" when I took the first bite.  The cake was light and fluffy (and boozy!), and the fruit topping was sweet and bright (and boozy!).  The apricots were a little bit tart, the cherries had that deep, sweet cherry flavor.  Everything was beautifully balanced and delicious. And the brandy!  Oh the brandy.  It was a beautiful compliment to both the cake and fruit.  It's richness and complexity are definitely part of what made this cake so memorable.  When can I make it again?


Brandy Buttermilk Apricot Cherry Upside-Down Cake
adapted from Eating Out Loud

Makes a 12" cake

For the topping:
1/4 cup butter (1/2 a stick)
3/4 cup brown sugar, packed
2 TB brandy

For the cake:
1/2 cup butter (1 stick)
1 cup sugar
2 eggs
1/2 cup buttermilk
1 1/2 cups flour
1 1/2 tsp baking powder
1/2 tsp salt
1 tsp vanilla
1/4 cup brandy
1 tsp fresh lemon zest
7 apricots, sliced into medium-thin slices
1/2 cup cherries, pitted and sliced in half

  1. Preheat oven to 350 degrees.
  2. In an oven-proof skillet (preferably cast iron), about 10-12", melt the butter, brown sugar, and brandy.  Over medium heat, cook the mixture until it begins to bubble.  Remove the skillet from the heat and set aside to cool.
  3. In a bowl, beat the butter and sugar together until light and fluffy.  Add the eggs, one at a time, and then the buttermilk.
  4. Slowly add the flour, and then add the baking powder, salt, vanilla, brandy, and lemon zest.  Mix just until a smooth batter is reached.
  5. Arrange the slices of apricots and cherries in the skillet, on top of the sugar mixture.  I wanted the top of the cake completely covered in fruit, so I really jam packed it in there.  If you want more of the cake to show through, use less.
  6. Pour the batter over the fruit, and use a spatula to smooth it evenly over the cake, making sure to spread it all the way to the edge of the skillet. Move the skillet to the oven and bake for 40-45 minutes, until a tester comes out clean.
Make it your own!  This recipe can be done in a ton of variations.  You can use any stone fruit in place of the apricots and cherries.  You can use any liquor you think will compliment the flavors well.  You know what would be really delicious?  Bananas and bourbon, of course!  I'll have to try that sometime soon.  

For the more vestal readers, first, I have no idea what you're doing reading a blog all about pairing booze and food (not that I don't appreciate the readership), and second, I'm confident this cake is still a knock-out without the brandy.  

Thursday, June 10, 2010

Deliciously Sweet, Contrarily Sour

Recipe: Sweet and Sour Pork

This dish is a bit like my job search.  You know...at times sweet, and other times, um, sour. Pungent. Acrid. Biting. I totally broke out the thesaurus on that one.  Anyway, I had a bit of a rough week, on the job front, that is.  I wish I had some of this on hand to brighten things up because, while in life sour is generally inauspicious, in food it can be part of a necessary balance.  A delicious, delectable balance.  I'm putting the thesaurus away now, I promise.

I made this many weeks ago.  Remember Husband's birthday cake?  Yeah, this was the dinner that preceded dessert.  It turned out far better than I ever dreamed!  See, I'm not actually even a fan of sweet and sour sauce.  I don't like my food cloyingly sweet.  The recipes I see usually call for gobs of sugar (thus the cloy!*), ketchup, cider vinegar, and orange juice.  I know most Chinese food I eat is anything but authentic, but that doesn't even include soy sauce!  It's like the food culture supposedly inspiring the dish is completely lost.  After some hunting around, and massive experimentation in the kitchen, I finally rejiggered** something that has notes of the original Americanized dish, and hints of a more "traditional" Americanized, Chinese-influenced dish. [Phew!  That one was hard to type with a straight face!] That's right, I threw in a little ketchup and sugar, along with some darn soy sauce!  And oyster sauce!  And if we're using vinegar here, it should be rice wine vinegar, right?!

Getting the sauce just right was pretty hard.  The recipe below is definitely not hard and fast measurements.  If it's not sweet enough, add more juice or plum sauce (or ketchup if you must).  If it's not sour enough, add more vinegar.  For salt, add more soy.  For acid, more pineapple juice. You get the idea.  The oyster sauce, I think, gives it a bit more depth of flavor (umami if you'll pardon my buzz word), and the plum sauce gives it some sweetness without that ketchup tang.  But if you don't have plum sauce and oyster sauce on hand, by all means leave them out.  Don't buy them just for this one dish.  A bit more sugar and maybe some Worcestershire sauce would be acceptable substitutes.  Just keep tasting it and adjusting until it tastes just right to you.  This was the blend that was to Husband's taste bud's liking.

I know battered and deep fried chicken is what you normally get at the Chinese fast food joints, but who needs that?  Not only is it unhealthy, but it's unnecessarily unhealthy.  That's the worst kind!  Sure, battered and fried meat is flavorful, but you're lathering your food in sauce.  A flavorful sauce!  And I think the stir-fried pork provided a nice texture contrast to the soft vegetables.

Now I want to talk a little about mirin.  Have you heard of it?  Do you have a bottle in your pantry?  I highly recommend that you do!  It's a sweet rice wine, and I love it.  It has a sweet, mild flavor that goes well in all kinds of Asian-inspired dishes.  I like to use it instead of sugar.  It gives the sweetness I need and a bit more flavor. There's definitely more recipes with mirin on the way, so stock up!  I buy it at my local Asian market, but I've seen it at the major grocery stores too, right by the rice wine vinegar.

It's funny that I went into this dish not even liking sweet and sour sauce, and I came out of it with a new recipe in my arsenal!  Win!  Think you don't like it too?  Give this one a try.


*Is cloy a word?  Did I invent another word?  I guess that's what happens when you're bananas for bourbon.  New words tend to pop up in your repertoire.

**See what I mean?


Sweet and Sour Pork

Makes about 6 servings

1 lb pork loin, sliced into bite sized pieces
1 green bell pepper, chopped
1 red bell pepper, chopped
1 medium onion, chopped
5 cloves garlic, minced
1 can chopped pineapple in natural juices (not the kind in syrup), drained and juice reserved
3 stalks green onion, sliced into rounds
vegetable oil

For the marinade:
1 1/2 TB soy sauce
3 tsp mirin (sweet rice wine)
1 1/2 TB sesame oil
1 1/2 TB corn starch

For the sauce:
3 TB ketchup
2 tsp plum sauce
2 tsp oyster sauce
2 tsp corn starch
2 tsp sugar
2 tsp soy sauce
1 tsp rice wine vinegar
1/2 inch knob of ginger, minced
1/4 cup reserved pineapple juice
1/4 cup orange juice

  1. Mix all the ingredients for the marinade and place into a container or ziplock bag with the pork.  Marinate for about 30 minutes.
  2. Whisk together the sauce ingredients, adjusting quantities to taste, and set aside.
  3. In a wok or saucepan over medium-high heat, add 1 TB of vegetable oil and stir-fry the pork until it is browned on all sides, about 5-7 minutes. Remove the pork from the wok and set aside.
  4. Add another TB of vegetable oil, if needed, and stir-fry the bell peppers, onion, and garlic until softened and aromatic.  Add the sweet and sour sauce, pork, and pineapple, and simmer until thickened and lovely, about 10-15 minutes.  Sprinkle in the green onions at the very end.
  5. Serve over jasmine rice (preferably brown), and enjoy!

Friday, June 4, 2010

Invoking Memories

Recipe: Berry Crisp

The best compliment I've ever received from someone who ate my food was an old co-worker who said that my Christmas rugelach reminded her of the ones her aunts used to make when she was a kid.  She said the best food is the food that invokes memories, and it is so true!  Vegetable and barley soup reminds me of my grandmother.  She always had a pot of it simmering on the stove when I went to her house.  Rice sprinkled with seaweed will always remind me of my freshman year in college, when Husband and I practically lived off the stuff (he had a handy little rice cooker in his dorm room).  And blackberries...well there will always be a special place in my heart for blackberries.

Growing up, there was an abundance of blackberry bushes all around my neighborhood.  Right across the street was the best spot for picking.  Come summer we would pick tubs and tubs of blackberries and bake tarts, pies, and cobblers galore!  I remember my neighbor's adorably cuddly Samoyed, rather ironically named Killer, helping himself to the berries of our labor if we weren't careful.  I remember baking with my mom in the kitchen, my sister and I fighting over who got to eat the leftover pie dough.  And unfortunately, I remember the year a fire burned down a sizable portion the area due to a brush fire, after which the city passed super strict laws about the distance of brush growing near peoples' houses.  They came and cut away all those wonderfully blackberry bushes, and our summer blackberry baking became nothing but an occasional occurrence. It was sad. Those poor blackberry bushes would never have dreamed of catching fire and burning our neighbor's house down!

To this day blackberries are my favorite berry.  A good, ripe blackberry has such a deep, sweet flavor.  It has the brightness of a berry, but something more too.  They're just more complex than a blueberry and strawberry in a way I can't describe. You just can't beat it.  So when they were on sale for cheap a few weeks ago, naturally, I stocked up!

I was tempted to do a cobbler, always my mom's go-to dessert.  They're delicious and easy, what's not to like?  But I was really in the mood for a little texture, and something with oats.  Oats are just the best in desserts, aren't they?  Once I decided on doing a crisp, I hunted around for a recipe, and ended up kind of mushing a bunch of ideas into one.  After the muffins, I didn't really have enough blackberries to go for a mono-fruit dessert, so instead I opted for an ensemble.

I had some delicious pears, a few strawberries, and to get the volume of fruit I wanted, I threw in a few frozen blueberries I had left over.  The great thing about crisps is that you can use whatever you want.  You could do one entirely with blackberries, or mix it up with some apples or stone fruit.  Whatever floats your boat, which is extremely useful when there's something different on sale at the store every week at this time of year.

I did end up making this boozy by throwing in some brandy.  When it first came out of the oven and I burned my mouth I was so impatient to try it, I could taste the brandy and it was delicious.  But when I ate some the next day the flavor had dissipated and I couldn't really taste it anymore.  I like booze to play a part in the background of my baked goods, but if it's not even detectable, then you're just wasting perfectly good alcohol..  Blasphemy!  Next time I would just leaving it out all together.  Blasphemy!  Damned if I do, damned if I don't.  It really just comes down to what fruit you're using.  If I had used only blackberries, the brandy probably would have come through a bit better.  If I was using apples, some apple brandy would have been awesome.  Grand Marnier and peaches. Bourbon and apricots.  Chambord and raspberries...

I'll stop before my drool over the keyboard rends finishing this post impossible, but the point is, finding ways to better booze this recipe is as limitless as deciding what fruit to use.  And that's what makes it fun!  Crisps are right there with cobblers when it comes to simplicity.  This is definitely one you could make with your kids, and start your own food memory tradition.

You may notice there's a bit of ice cream in these pictures.  I think ice cream and crisps go together like booze and berries. But it's a trick!  That's no ice cream.  It's a frozen banana.  Have you heard of this trick? Take a frozen banana (because you're freezer is overflowing with overripe bananas you're constantly stashing away like mine is, right?), and put it in the food processor.  At first it'll look a bit iffy, but after a minute or two, the banana breaks down enough that it gets this irresistibly creamy texture that is very reminiscent of ice cream (or frozen yogurt may be a bit more appropriate).  Seriously, that is 100% banana!  It's an easy, healthy dessert!  If you want to really spice it up, throw a spoonful of peanut butter in the food processor with the banana and top it with some chocolate chips. Heaven!  Ok, I admit it. I wanted a scoop of ice cream for the picture, and with my lack of an ice cream maker, I used the frozen banana trick.  But that's all changed now because I am now the proud owner of an ice cream maker!  Yay!  But that's another post.

So what's one of your favorite food memories?


Boozy Berry Crisp
loosely adapted from Parade

makes about 8 servings

For the berries:
6 cups berries (or other fruit of your choice, cut into bite size pieces)
1/4 cup sugar
1/4 cup all purpose flour
1 tsp lemon juice
a pinch of cinnamon
1/4 cup booze of choice (completely optional, choose wisely)

For the crisp:
1 cup oats
1/2 cup all purpose flour
2/3 cup brown sugar
1 tsp cinnamon
1/4 tsp ground ginger
1/4 tsp nutmeg
1/4 tsp salt
7 TB butter, cubed and chilled

  1. Preheat the oven to 350 degrees and prepare a 9" pie plate (or similar-sized vessel) with baking spray.
  2. Combine all the ingredients for the berries in a bowl and set aside.  [If you want to save on dishes to wash, you can just mix this directly into the pie plate.]
  3. In a medium bowl, combine all the ingredients for the crisp except the butter. Stir to combine, then cut in the butter with a pastry blender, a fork, or even your fingers, until it comes together into small crumbles.
  4. Pour the berry mixture into the pie plate, then sprinkle the crisp mixture over the top.  Bake for 1 hour, or until the crisp is a golden brown and the berries underneath have make a bubbling, thick syrup of deliciousness.  Let cool for 15 minutes.  Trust me on this one, it's hot.  You might want to place the pie plate on a baking sheet in case the fruit bubbles over, creating a total mess in your oven.  I decided to be a daredevil and wing it, and I came out unscathed.  Or rather, my oven did.